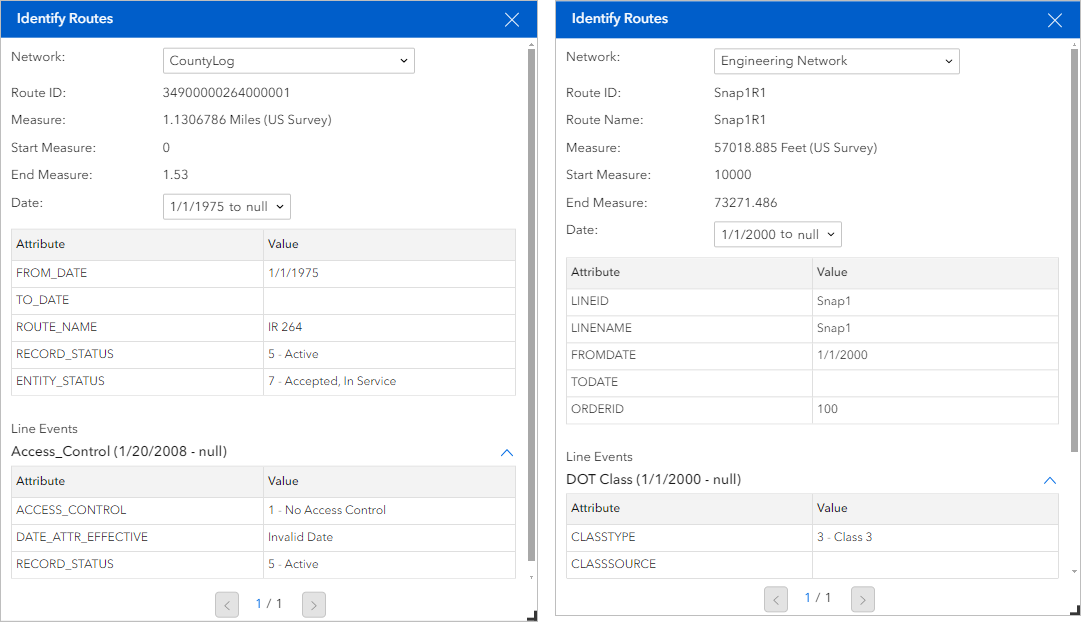
The LRS Identify widget allows you to identify route locations on the map and view measure values, attributes, and attributes of any underlying events for those locations.
Examples
Use this widget to support app design requirements such as the following:
- You want to click a location on a route and get route attributes, measure values, and event attributes.
- You want to use route information to run additional queries and populate forms.
Usage notes
This widget requires connection to a Map widget. To identify routes and events, the Map widget must be connected to a web map data source published with an LRS with the Linear Referencing capability enabled. To view versions other than the default version, the web map data source must be published with an LRS with the Version Management capability enabled.
To create an LRS and publish a feature service with the Linear Referencing and Version Management capabilities enabled, follow the steps in the ArcGIS Pro documentation:
- Pipeline Referencing—Create an LRS and share an LRS as web layers
- Roads and Highways—Create an LRS and share an LRS as web layers
When you click a route on the map, the widget highlights identified routes and shows their attributes in the widget panel. The widget displays the measure value for the clicked point location and minimum and maximum measure values for the route.
If the point you click on the map intersects with more than one route, you can use the page navigation tools at the bottom of the Route Locations panel to view each route.
The widget can also display line event attributes and point event attributes.
Settings
The LRS Identify widget includes the following settings:
- Select a Map widget—Select a Map widget.
- Load Layers—Load layers from the web maps in the connected Map widget. To load layers, the Map widget must be connected to a web map with LRS layers.
- Clear Layers—Remove all loaded layers from the widget.
- Layer configuration—Click a layer to open the Layer configuration panel. The Label setting appears for all layers. The Use Field Alias and Configure fields settings only appear for network layers.
- Label—Provide a meaningful label for the layer. This label appears in the widget panel at run time.
- Use Field Alias—Turn on this setting to display field aliases at run time. An alias, or display name, is an alternative name for a field. It is usually a more user-friendly description of the content of the field. Unlike true field names, aliases do not have to adhere to the limitations of the database, so they can contain special characters such as spaces.
- Configure fields—Choose which attribute fields from the layer to include in the widget panel at run time.
- Default Network—If you add more than one network layer, you can set a default network layer.
- Selection settings—Configure settings related to how the widget displays selected features.
- Highlight—Use the color picker to choose a color for the selection highlight.
- Width—Define the width for the selection highlight.
- Show Line Events—Turn on this setting to display line events at run time.
- Line Attribute Set—If a layer is configured with attribute sets, you can choose them from the drop-down menu. The widget only displays line events that are part of the attribute set. Attribute sets are collections of event layer attributes.
- Show Point Events—Turn on this setting to display point events at run time.
- Point Attribute Set—If a layer is configured with attribute sets, you can choose them from the drop-down menu. The widget only displays point events that are part of the attribute set. Attribute sets are collections of event layer attributes.
Identify routes on a map
To identify routes on a map, complete the following steps:
- Start Experience Builder.
- Add a Map widget. Connect it to a web map with LRS data published with the Linear Referencing capability enabled and, optionally, the Version Management capability enabled.
- Add an LRS Identify widget. Connect it to the Map widget, then load LRS layers from the Map widget.
- Publish the app.
- Launch the app. If prompted, sign in to your ArcGIS Enterprise organization.
- Zoom to the location where you want to identify routes.
- Click the LRS Identify widget
 , then click a route.
The route attributes, measure values, and any available event attributes appear.

Interaction options
This widget supports data actions, which you can enable on the Action tab of the widget's settings.
You can use data actions in the LRS Identify widget to launch the Add Point Event widget or Add Line Event widget and populate values. To do this, you must turn on the Add Point Event and Add Line Event data actions in the LRS Identify widget's settings.
The LRS Identify widget's Add Point Event and Add Line Event data actions can populate the route and measure parameters in the Add Point Event and Add Line Event widgets.