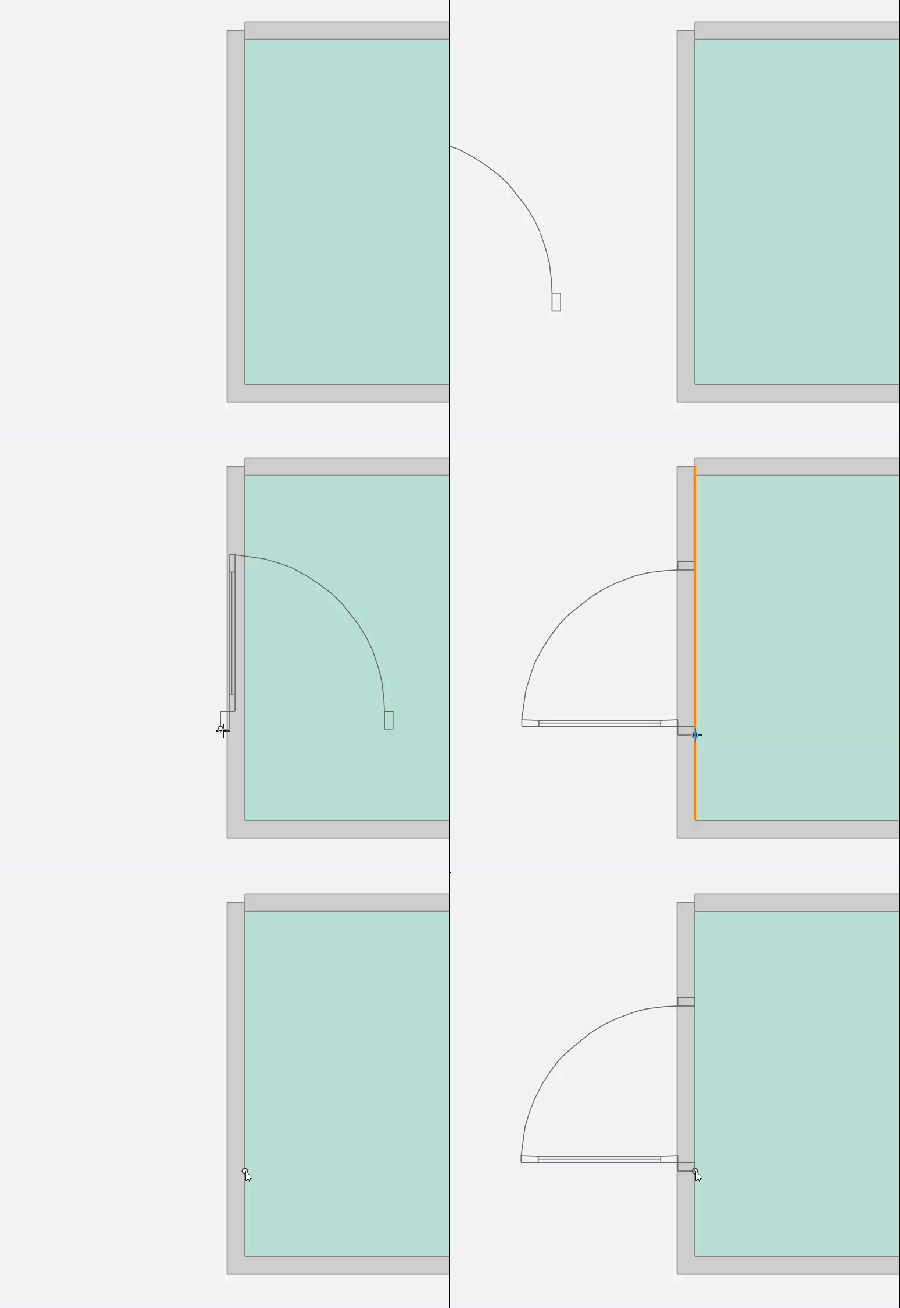
Available with the ArcGIS Indoors Spaces extension.
Indoor Floor Plan Editor includes a default palette for placing features such as doorways, windows, stairways, and furniture into a floor plan. You can create and publish a custom palette if your organization has additional features you want to place in Floor Plan Editor. You can use the Palette.gdb sample geodatabase included in the Indoors product data files as a template for creating custom palette features in ArcGIS Pro. You can maintain your own feature templates for features in a published custom palette feature service. The default palette in Floor Plan Editor supports the 1984 Web Mercator Auxiliary Sphere projection; custom palettes can support custom spatial projections.
Custom palette feature structure
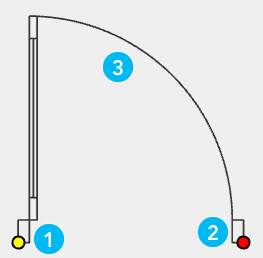
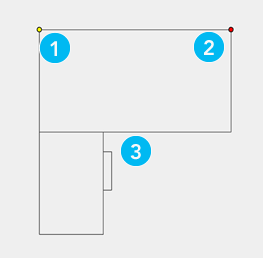
A custom palette is made by creating and sharing a feature layer in ArcGIS Pro containing template features. The features in the palette layer are used to place features in Floor Plan Editor. Placing an object from the palette inserts it as a feature in the Details layer of the floor plan. A palette feature contains a primary and secondary anchor point to assist in snapping when placing the object in Floor Plan Editor from the palette.

The images below contain more details on the primary and secondary anchor points:


| Element | Description |
|---|---|
 | Primary anchor point, for snapping to features while placing the object in Floor Plan Editor. |
 | Secondary anchor point, for automatic rotation while placing the object in Floor Plan Editor. |
 | The template feature in the palette feature layer. This geometry is inserted as a feature in the Details layer while placing the object in Floor Plan Editor. |
Custom palette layer schema
A custom palette is created as a feature layer with a defined schema, shared as a feature service. The required schema for a palette feature layer contains the following fields:
| Field name | Type | Required | Description |
|---|---|---|---|
NAME | Text | Yes | The name of the palette feature. |
DESCRIPTION | Text | Yes | A short description of the palette feature, such as brand of furniture or dimension of doorway. |
FEATURE_TYPE | Text | Yes | Defines the type of feature in the palette. The following domain defines the allowed values and the types of features to which they apply:
FEATURE_TYPE field values must match the domain to be recognized in Floor Plan Editor. |
DETAIL_USE_TYPE | Text | Yes | Additional description for the feature type value. This value is also used for the USE_TYPE field in the Details feature layer. |
PRIMARY_ANCHOR_X | Double | Yes | The x-coordinate value for the main anchor point of the palette feature. This anchor point determines the snapping point of the palette feature when it is first placed in Floor Plan Editor. |
PRIMARY_ANCHOR_Y | Double | Yes | The y-coordinate value for the main anchor point of the palette feature. This anchor point determines the snapping point of the palette feature when it is first placed in Floor Plan Editor. |
SECONDARY_ANCHOR_X | Double | Yes | The x-coordinate value for the secondary anchor point of the palette feature. This anchor point determines the snapping point of the palette feature when it is first placed in Floor Plan Editor. |
SECONDARY_ANCHOR_Y | Double | Yes | The y-coordinate value for the secondary anchor point of the palette feature. This anchor point determines the snapping point of the palette feature when it is first placed in Floor Plan Editor. |
Create and share a custom palette feature layer in ArcGIS Pro
You can create a custom palette in ArcGIS Pro by adding features to the sample palette provided in the Indoors installed product data. Consider the following recommendations when creating features in a custom palette:
- Create palette features in a geographic location near your indoor data. This helps avoid distortion of palette features caused by projection.
- Place all palette features close together in the palette layer to further reduce distortion.
- Create palette features at the same size you want them to appear in the floor plan when they are inserted from the palette.
- Use bright colors for anchor point feature symbology to assist with feature placement when using the palette.
Complete the following steps to create a custom palette feature layer in ArcGIS Pro and share it to your ArcGIS Enterprise portal for use in Floor Plan Editor:
- Download the Indoors product data files and unzip the Palette.gdb file located in the SampleData folder.
- Start ArcGIS Pro.
- Sign in to your Enterprise portal if necessary.
- Open a new or existing map.
- Use the Catalog window to browse to the Palette.gdb geodatabase you unzipped from the Indoors product data in step 1.
- Add a feature class from the Palette.gdb geodatabase that uses the WGS 1984 Web Mercator Auxiliary Sphere projection.
If your data is in a spatial reference other than WGS 1984, you must project the palette feature class to match the coordinate system of your web map.
- Optionally, delete any features from the sample palette that are not needed in your custom palette.
- Optionally, project the palette layer to a desired spatial reference.
Note:
You must recalculate the geometry of the primary and secondary anchor points for any existing palette features after projecting the palette layer to a new coordinate system.
- Create a points feature class for primary anchor points.
- Create a points feature class for secondary anchor points.
- Create more palette features to represent detail features you want to add to the floor plan in Floor Plan Editor.
Note:
If true curves are present in the palette features, the true curve geometry is generalized when a palette feature is used to insert a feature in the Details layer in Floor Plan Editor.
- Place anchor points on palette features using the primary and secondary anchor point feature classes.
Create anchor points in the primary and secondary anchor point feature classes, but place them on palette features in the polyline feature class. Place the anchor points based on the desired symmetry of the palette feature and how the palette feature should snap to existing features when being placed using Floor Plan Editor.
- Calculate geometry attributes for the point x-coordinate and point y-coordinate on the primary and secondary anchor point layers after placing all anchor points.
Note:
Palette features use primary anchor points for snapping, and secondary anchor points for rotation. If no X- and Y-anchor point values are provided, the feature can still be placed. In this case, the centroid of the feature is used for snapping, and no rotation is applied.
- Copy the calculated x-coordinate value from the primary anchor point layer to the PRIMARY_ANCHOR_X field in the polyline palette feature layer you selected from the Palette.gdb geodatabase.
Repeat this step for the y-coordinate of the primary anchor point layer, as well as the x- and y-coordinates of the secondary anchor point layer.
- Save the edits to the palette layer.
- Share the palette layer as a feature service.
The customized feature palette layer is shared as a feature service to your Enterprise portal. You can choose the custom palette in the Palette section of the App Settings pane for Floor Plan Editor and use it to insert new features in the Details layer.
The sharing settings of the palette layer must match the sharing settings of the app so users can access the palette features. You can update the palette feature service after it is published by editing the feature service in ArcGIS Pro.