ArcGIS Field Maps includes several different tools and features that allow you to access your maps, collect data, share your location, and annotate your maps, all in one app on your mobile device, even when disconnected.
When using ArcGIS Field Maps, you'll work with the following:
- Maps list—Find and open the maps that matter to you, and turn location sharing on and off.
- Map and panel—Visualize and interact with your data, including initiating data collection.
- Data collection form and Location target—If you’re working with an editable map, you can use the form and Location target when capturing a new asset or observation or performing an inspection and updating an existing asset or observation.
- Floor-aware map and floor filter—If you're working with a floor-aware map, you can edit indoor features and use the floor filter to display information about floors and buildings.
The maps and capabilities you can access in ArcGIS Field Maps depend on what licenses you have. See Requirements to learn more about what licenses and privileges are required for collecting data and location sharing.
If you're using the Field Maps mobile app on a Windows device, you may be using a mouse and keyboard. See Mouse and keyboard interaction (Windows) for tips on using a mouse and keyboard to interact with Field Maps.
Note:
The information provided on the Android version of Field Maps help topics also applies to Field Maps on Windows. To learn how to install Field Maps on a Windows device, see How to install Field Maps on Windows.
Maps list
Find the maps you want to work with through browsing and searching. The available maps include those you've made or that are shared with a group of which you are a member. If you don't have a data connection, only on-device maps are included.
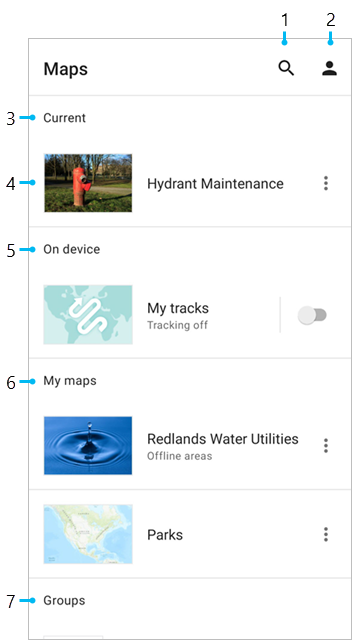
Search—Enter text to find a map. Your search term is used to filter the maps in the list. You can tap Read-only or Editing to limit the list to maps with these capabilities.
The Search function searches the maps displayed in the categories shown, as well as all publicly accessible maps on your portal (ArcGIS Online or ArcGIS Enterprise). Your search term is used to filter the maps on your screen as well as one or two additional categories—one titled with your organization's name and another titled ArcGIS Online. If you are using an Enterprise portal without the ability to search ArcGIS Online for content, you won't see the ArcGIS Online category.
- Profile—View your currently signed-in account and the data collection, location sharing, and general settings associated with it.
- Current section—Shows the open map. Tap the map card to return to the map. This section displays if you have an open map.
- Map card—Open the map or access map areas. If the map displays the text Offline areas, it has offline map areas.
- Maps without offline map areas can be opened and used without downloading the map to your device. You can add an offline map area if the map supports offline use.
- Maps with offline map areas must be downloaded before they can be used. Tap the map to view, download, and manage the available offline map areas, or to add your own.
A map area with a download icon
 can be downloaded to your device. A map area with an Overflow menu
  is already on your device and can be synced or removed. If it is a map area you defined on the device, you can also rename it.
 - On device section—Shows mobile map packages (MMPKs) and maps with map areas downloaded to your device. If location sharing is enabled for your organization, the first map under On device is titled My tracks. You can turn location sharing on or off to set the duration and tap the map card to view the map of tracks collected on your device. See Track mobile users to learn more about location sharing.
Note:
The On device section only displays if MMPKs or map areas are downloaded to your device, or if location sharing is enabled for your organization.
The My tracks map card will move to the Current section when it's the currently open map.
- My maps section—Shows maps you own.
- Groups section—Shows groups of which you are a member that have shared maps. This only displays if you are a member of any such groups. Tap a group card to view the maps in a group.
Note:
If you are using the app without signing in, your screen appears slightly different. You'll see the Sample Maps category, and the search function will search Sample Maps and ArcGIS Online. You can tap Profile  to sign in.
Map
Use the Maps list to open a map. When you open a map you can find, view, and capture assets or observations, mark up the map, and share notes with others.
Note:
The capabilities available in a map depend on the licenses you have and how the map is configured.
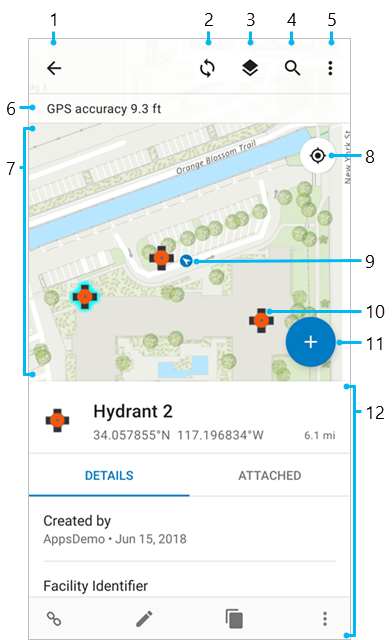
- Back—Go back to the Maps list. If you opened the map from a group or list of map areas, the arrow takes you to the group or list of map areas in the Maps list.
- Sync—The Sync icon
 appears if you are working in an offline map area that’s part of a map that has been enabled for editing. Tap Sync
  to send your changes. When the sync icon has a dot
  , you have pending edits. See Sync your work.
Depending on the configuration of the map you are using, sync may get changes that were made since your download and copy them to your device. See Optimize download and sync.
- Layers—View the layers in the map, change their visibility, and see any errors. If layer filters were configured, a Filter button
 appears next to the layer and can be used to filter features on the map based on attribute values. Filters can be defined on multiple fields within the layer, and features must meet all filtered values to display on the map.
 - Search—Find addresses, places, assets, and observations. Search honors what is configured in the map. See Configure feature search in ArcGIS Online or Configure feature search in ArcGIS Enterprise. Finding addresses and places requires an internet connection. You can search for assets, observations, and coordinates without a connection.
Tip:
You can search by scanning a barcode or QR code. Start a search and tap Scan Barcode or QR code
 .
. - Overflow—Change the basemap, view and use bookmarks, view the legend, measure on the map, add markup to the map, or share a link to the map. If the map is enabled for editing, the option to edit multiple features appears.
Note:
When using markup, different tools are available. For more information, see Markup.
- Location banner—See information about your location. Tap the banner to see additional details, including the accuracy, time the position was received, and location provider. If location sharing is enabled for your organization, you can turn Share my location on and off and set the duration.
- Map—View and interact with your assets and observations. Tap an asset or observation to view its form. You can pan, zoom in and out, and rotate the map. Long press to use a magnifier and drop a pin at a location of interest or search to get result pins on the map. Tap a pin to view its details.
Tip:
If you rotate the map, the rotation angle is shown by a compass
 in the upper right corner of the map. Tap the compass to remove the rotation and orient the map north.
 - Location button—Display where you are. It has three modes:
- Your location displayed on the map (
 )
) - The map automatically centering on your location while oriented north (
 )
) - The map automatically centering on your location and oriented the direction you are facing (
 ).
).
 ).
). - Your location displayed on the map (
- Your location—Where you are. Recenter it on the screen by tapping the Location button. This displays while your location is in the current extent and ArcGIS Field Maps can access your location.
- Features—View your assets as features on the map. Tap a feature on the map to see its details in the panel, including any attachments, related records, or media (including charts and images).
- Add—The Add button
 appears on maps that are enabled for editing. Start capturing an asset or observation at your location. This shows the data collection form and tools. See Capture.
 Panel—Tap an asset, observation, or markup to view additional information. Swipe the panel up to view more information at once. Here, the panel shows the form for the selected asset and the actions that can be taken with it. The panel can also show details of other items, such as search results and dropped pins, or it can show a list of results, such as the assets and observations selected on the map or search results. The panel is also used to display some specialized content, such as available basemaps or outstanding edits that can be synced.
When the panel displays a list, tap an item of interest to view its form (for assets and observations) or details (for pins). When displaying a single item (not a list or specialized content), the panel provides access to actions. Depending on the amount of information displayed, actions are available either in-line or on a toolbar.
Actions include Directions
 , Compass
  (to get distance and bearing to the location), and Favorite
  .
. Note:
The Directions action is not supported on Windows.
If you tap on a polyline that contains measure values (m-values), the Find Measure action
 appears. Tapping Find Measure opens a dialog box displaying the m-value nearest to your location and the range of m-values within the polyline. From the Find Measure dialog box, you can enter the m-value you want to find. After tapping OK, a pin is dropped on the m-value's location. From here, you can use the Compass or Directions actions to navigate to the value. You can also add the value to your favorites list and collect a feature at the m-value's location. To learn more about m-values in the context of linear referencing, see Introduction to linear referencing.
Note:
If the data in the polyline is invalid, an Unable to find measure dialog box appears and the error is written in the troubleshooting log. You can access the troubleshooting log by browsing to your Profile
 and tapping Troubleshooting.
Forms include the details about the asset or observation and access to any attachments. In addition to photos and videos, you can view attached audio clips, PDFs, Microsoft Word documents, and Excel spreadsheets if you have apps for them on your device. From the form, you can save attachments to your device. Tap the asset or observation's symbol to zoom to it. Depending on the editing permissions, you may also see actions for Edit
 , Copy
  , Delete
  , and Collect Here
  . If there are related assets, observations, or reports, you can jump to the Related items
  . See Capture and Inspect.
Panel
Tapping an asset, observation, or markup and swiping the panel up allows you to view additional information at once. The panel shows the form for the selected asset and the actions that can be taken with it. The panel can also show details of other items, such as search results and dropped pins, or it can show a list of results, such as the assets and observations selected on the map or search results. The panel is also used to display some specialized content, such as available basemaps or outstanding edits that can be synced. When the panel displays a list, tap an item of interest to view its form (for assets and observations) or details (for pins). When displaying a single item (not a list or specialized content), the panel provides access to actions. Depending on the amount of information displayed, actions are available either in-line or on a toolbar.
- Edit
 -Edit the data collection form.
 - Copy
 -Copy the data collection form.
 - Collect Here
 -Collect data at the current location.
 - Directions
 -Get directions to a location.
 - Compass
 -Get distance and bearing to a location.
 - Favorite
 -Add a location to your favorites list.
 - Delete
 -Delete the asset, observation, or markup.
 - Attachments-Forms include the details about the asset or observation and access to any attachments. In addition to photos and videos, you can view attached audio clips, PDFs, Microsoft Word documents, and Excel spreadsheets if you have apps for them on your device. From the form, you can save attachments to your device.
- Find Measure
 -If you tap on a polyline that contains measure values (m-values), the Find measure action appears. Tapping Find measure opens a dialog box displaying the m-value nearest to your location and the range of m-values within the polyline. From the Find measure dialog box, you can enter the m-value you want to find. After tapping OK, a pin is dropped on the m-value's location. To learn more about m-values in the context of linear referencing, see Introduction to linear referencing.
Note:
If the data in the polyline is invalid, an Unable to find measure dialog box appears and the error is written in the troubleshooting log. You can access the troubleshooting log by browsing to your Profile and tapping Troubleshooting.
Tip:
A related asset, observation, or inspection (report) is accessed through the form of the asset or observation to which it is related. Use the Related section of the form to select a related asset, observation, or inspection. Depending on what is supported by your relationship, you can add new related items, view read-only forms, and start editing. See Capture an asset or observation related to another and Add a related report.
Data collection form and location target
If the currently open map has been enabled for editing, you can collect data using the data collection form. The data collection form opens when you start capturing a new asset or observation or inspect an existing one. When filling out a form, use the Location target to update the asset or observation's location. To start filling out a form and providing location, use the map and read-only form.
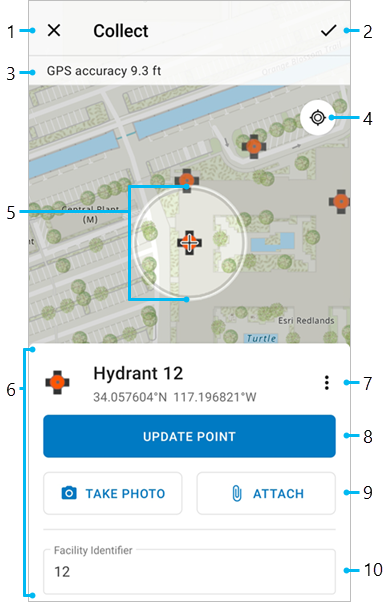
- Cancel—Stop capturing a new asset or observation, or discard edits made to an existing one during an inspection.
- Submit—Save the new asset or observation, or save the changes made to an existing one. If you're working online, others immediately see your edits. If you're working offline, your edits are available to others once you sync
 them.
them. - Location banner—See information about your location. Tap the banner to see additional details, including the accuracy, time the position was received, and location provider. If location sharing is enabled for your organization, you can turn Share my location on and off.
- Location button—Recenter the Location target on your location. This displays when the Location target isn't centered on your location.
- Location target—Where an asset or observation (or a point in the location of a length or area) will be placed on the map. It is composed of a circle and crosshairs. It displays if your layer allows updates to the location. See Capture, including the Edit location section.
- If the Location button doesn't display, the map is already centered over your location and the Location target moves with you.
- If the location meets the required accuracy, the circle of the Location target is blue, as is the text in the Location banner. Otherwise, the circle and text are red.
- If the Location target isn't centered over your location, the Location button displays, the circle of the Location target is gray, and the text in the Location banner is gray.
Note:
The circle isn't an accuracy indicator. Use the Location banner for accuracy information.
- Form—Fill out entries to provide information. You can expand the panel to see more of the form while filling out entries. See Fill out forms.
- Overflow—Edit the location, such as undoing changes, updating and deleting points, and streaming.
- Update Point (single places)—Move the asset or observation under the Location target. This displays if your layer allows updates to the location.
It is replaced by Add Point for lengths and areas, which adds a point to the asset or observation under the Location target.
- Take Photo and Attach—Add photos and videos. This displays if your layer supports attachments.
- Form entry—An entry in the form where information can be provided.
Note:
When working with the map outside of data collection, a blue dot on the map shows your location. This is intentionally hidden during data collection when the map is centered over your location—the dot obscures the area around you, which is often your area of interest.
Floor-aware map and floor filter
When you open a floor-aware map in Field Maps, you can use the Floor filter to display floor information based on the building in the visible map extent. The Floor filter appears if the following requirements are met:
- The map must be floor-aware.
- A facility must be in the visible map extent.
You can view floor-aware maps and edit floor-aware layers in Field Maps.
View floor-aware maps
Filter indoor assets by floor and view information about floors and buildings.
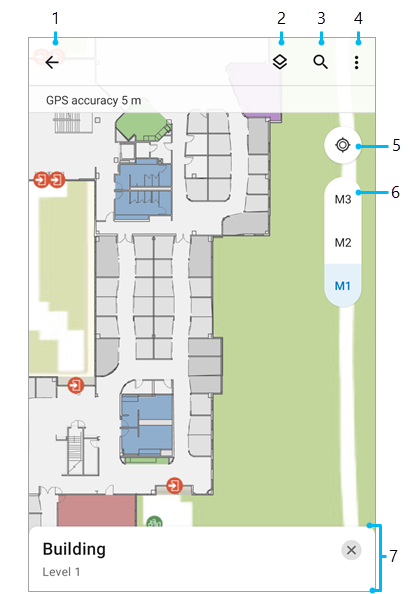
- Back—Go back to the Maps list. If you opened the map from a group or list of map areas, the arrow takes you to the group or list of map areas in the Maps list.
- Layers—View the layers in the map, change their visibility, and see any errors. If layer filters were configured, a Filter button
 appears next to the layer and can be used to filter features on the map based on attribute values. Filters can be defined on multiple fields within the layer, and features must meet all filtered values to display on the map.
 - Search—Find addresses, places, assets, and observations. Search honors what is configured in the map. See Configure feature search in ArcGIS Online or Configure feature search in ArcGIS Enterprise. Finding addresses and places requires an internet connection. You can search for assets, observations, and coordinates without a connection.
Tip:
- Overflow—Change the basemap, view and use bookmarks, view the legend, measure on the map, add markup to the map, or share a link to the map. If the map is enabled for editing, the Edit Multiple features option appears.
Note:
When using markup, different tools are available. For more information, see Markup.
- Location button—Display where you are. It has three modes: your location displayed on the map (
 ), the map automatically centering on your location while oriented north (
 ), and the map automatically centering on your location and oriented the direction you are facing (
 ). Tap it to switch between the centered modes. Pan the map to stop centering on your location. If your current location is unavailable, the icon is gray (
 ).
). - Floor filter—Display floor information for the building in the center of the visible map extent. Tap the Floor filter to expand the list of available floors. Choosing a floor filters the features in that facility based on the Floor Field parameter. The Floor filter disappears if no facilities are present in the visible map extent.
- Floor panel—View additional details about the selected floor. Collapsing the Floor filter closes the panel.
Edit floor-aware layers
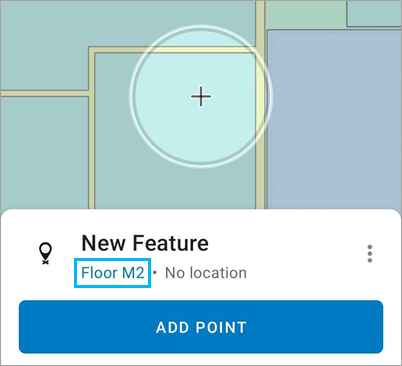
When editing floor-aware layers, the floor value is automatically generated from the floor filter, as shown in the image below. You can tap on the floor value to change it while filling out the form.
To learn more about indoor data collection, see Capture at an indoor location.
Mouse and keyboard interaction (Windows)
If you're using the Field Maps mobile app on a Windows device, you may be using a mouse and keyboard. For tips on using a mouse and keyboard to interact with Field Maps, see the following table:
| Map action | Mouse and keyboard interaction |
|---|---|
Zoom in and out | Ctrl+mouse wheel |
Zoom in | Double-click |
Zoom out | Alt+double-click |
Drop a pin | Right-click |